1. Sphinx のインストール方法
1.1. Sphinx とは
Sphinx は、reStructuredText記法で書かれた文章作成ツールで、テキストファイルをHTMLサイトword文章、 PDFやepubなどの様々な形式へ変換できる。
特に、数式、図などが混在する文章を作成するのに便利である。
Pythonの公式ドキュメントは Sphinx を使って書かれて、 また、Python以外の多くのプロジェクトでも Sphinx が利用されている。
- Restructured text:
Sphinx での文章ファイルは単なるテキストファイルであるが、様々なルールの 下で記述されていると文章の修飾を行うことができる。この文章フォーマットを
Restructured textと呼ばれる。
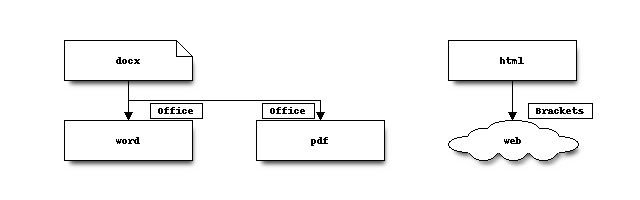
通常
通常のプログラムでは、pdf、htmlは別々のソフトで作成し、そのための 文章を書かなくてはならない。
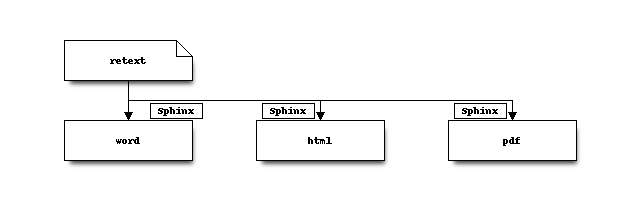
sphinx の場合
sphinx の場合は、一つのファイルから様々なフォーマットで 文章を作成することができる。
1.2. sphinx の文章作成環境の設定
1.2.1. 動作環境について
この文章は、xubuntu 22.04 における使用を想定しているが、versionが変わればうまく動作しないので 注意すること。最初にlatexをインストールしておかないといけない。ポイントはtexliveではなくtexlive-science をインストールすることである。
$ sudo apt-get -y install texlive-science # 本体
$ sudo apt-get -y install texlive-lang-cjk # 日本語版 (UTF8 対応)
$ sudo apt-get -y install xdvik-ja # プレビューを見るのに必要
$ sudo apt-get -y install dvipsk-ja # DVI から PostScript への変換用
$ sudo apt-get -y install gv #  Ghostscript 、 ps 形式の図を取り込んだ文書の作成用
$ sudo apt-get -y install texlive-fonts-recommended texlive-fonts-extra # TeX 用フォント
sphinx のインストールは、
$ sudo apt-get install python3-sphinx
によってインストールできる。バージョンは1.85になるはずである。
python3ではencodingはデフォルトで utf-8 となったため、環境設定はシンプルになった。
1.2.2. よく使うユーティリティと必要なモジュールのインストール
必要なモジュール等のインストールを terminal を開いて以下のコマンドで
インストールを行う。
retextとrst2pdf
$ sudo apt-get install rst2pdf retext kate
- retetxt :
Restructured text用のeditorである。
- kate :
Restructured textにも対応しているeditorでこちらの方が使いやすい。
- rst2pdf :
rstからpdfへの出力するソフト。今回は、このソフト経由でsphinxのpdf出力を生成しない。 あまりオススメでない。
JavaScript用数式パッケージ jsmath
$ sudo apt-get install jsmath
- jsmath:
この拡張機能は、数式をそのままHTMLファイルに埋め込みます。JavaScriptのパッケージ
blockdiag系の拡張のインストール
$ sudo apt-get install python3-sphinxcontrib.actdiag
$ sudo apt-get install python3-sphinxcontrib.blockdiag
$ sudo apt-get install python3-sphinxcontrib.nwdiag
$ sudo apt-get install python3-sphinxcontrib.seqdiag
$ sudo apt-get install python3-sphinxcontrib.spelling
- blockdiag:
ブロック図をテキストから生成するソフト。ただし、日本語を使う際にはひと工夫が要る。
graphviz 組み込み拡張機能なのでインストールの必要なし
- graphviz:
有向性グラフをテキストから生成するソフト。blockdiagと違い日本語が簡単に使えるので便利
html用のthemeのインストール
$ sudo apt-get -y install python3-sphinx-rtd-theme
レスポンシブのwebページになるので大変見やすい。
latex用のmhchemとsiunitx
化学系文章でよく出てくる化学式や単位混在の数値などは
latexで設定するのは大変なので、mhchemとsiunitxの2つのlatexパッケージを組み込む。
これらのパッケージはtexlive-scienceをインストールすると含まれているので、後述の
conf.py を変更するだけで良い。
- mhchem:
化学式などを書くのに便利なtexの拡張機能
- siunitx:
単位や数値などを書くのに便利なtexの拡張機能
- chemfig:
化学構造式をテキストで書くのに便利なtexの拡張機能
1.2.3. jupyter-notebookとの連携
ますは必要なモジュールをインストールする。
$ sudo apt-get install -y pandoc

$ sudo apt-get -y install python3-nbsphinx

$ sudo apt-get -y install python3-recommonmark python3-commonmark
- pandoc:
汎用の文章コンバータ
- nbsphinx:
sphinxの文章に直接jupyter-notebookの
*.ipynbを読み込むモジュール- commonmark:
sphinxをMarkdownに対応させる
1.3. conf.py の設定例
latexの出力を調整しようとすると source directory に存在する conf.py を変更しなくてはならない。
以下に、設定のポイントを示す。
1.3.1. code-blockのフォントサイズの調整
コードを文章に挿入する際はフォントを小さめにしておくとよい。
conf.py の先頭の方に以下を挿入する。フォントサイズは20行目のところを変える。
下の例では \scriptsize となる。
 1# If extensions (or modules to document with autodoc) are in another directory,
 2# add these directories to sys.path here. If the directory is relative to the
 3# documentation root, use os.path.abspath to make it absolute, like shown here.
 4#sys.path.insert(0, os.path.abspath('.'))
 5
 6# Below is to reduce font size in code block
 7# \tiny         5pt
 8# \scriptsize   7pt
 9# \footnotesize 8pt
10# \small        9pt
11#
12
13
14from sphinx.highlighting import PygmentsBridge
15from pygments.formatters.latex import LatexFormatter
16
17class CustomLatexFormatter(LatexFormatter):
18    def __init__(self, **options):
19        super(CustomLatexFormatter, self).__init__(**options)
20        self.verboptions = r"formatcom=\scriptsize"
21
22PygmentsBridge.latex_formatter = CustomLatexFormatter
1.3.2. jupyter-notebookとの連携
conf.py の先頭の方に以下を挿入する。
23# for jupyter-notebook
24
25from recommonmark.parser import CommonMarkParser
26
27source_parsers = {
28    '.md': CommonMarkParser,
29}
30
31from recommonmark.transform import AutoStructify
32
33github_doc_root = 'https://github.com/rtfd/recommonmark/tree/master/doc/'
34def setup(app):
35    app.add_config_value('recommonmark_config', {
36            'url_resolver': lambda url: github_doc_root + url,
37            'auto_toc_tree_section': 'Contents',
38            }, True)
39    app.add_transform(AutoStructify)
また、 # -- General configuration で extensions の後ろにコメントアウトしているのを外す
source_suffix = ['.rst', '.md']
# source_suffix = '.rst'
最後に、 index.rst の中の:
.. toctree::
    :numbered:

    jupyter
の下に jupyter-notbook のファイル名を入れておく。 具体的な文章作成の例 のtoctreeの項を参照のこと
1.3.3. blockdiag,graphvizとmathjaxの設定
jupyter-notebookとの連携も対応させておく。
# Add any Sphinx extension module names here, as strings. They can be
# extensions coming with Sphinx (named 'sphinx.ext.*') or your custom
# ones.
extensions = [
    'sphinx.ext.mathjax',
    'sphinxcontrib.blockdiag',
    'sphinxcontrib.actdiag',
    'sphinx.ext.graphviz',
    'nbsphinx',
]
1.3.4. html出力のための設定
# -- Options for HTML output ----------------------------------------------

import sphinx_rtd_theme
html_theme = 'sphinx_rtd_theme'
html_theme_path = [sphinx_rtd_theme.get_html_theme_path()]
1.3.5. latex出力のための詳細設定
以下はlatex出力の設定のコアとなる部分のコードである。
214# -- Options for LaTeX output ---------------------------------------------
215
216latex_elements = {
217# The paper size ('letterpaper' or 'a4paper').
218'papersize': 'a4paper',
219
220# The font size ('10pt', '11pt' or '12pt').
221'pointsize': '12pt',
222
223
224# geometry
225'geometry': '\\usepackage[vmargin=2cm, hmargin=2cm]{geometry}',
226#babel
227'babel': '\\usepackage[japanese]{babel}',
228
229# Additional stuff for the LaTeX preamble.
230#\\usepackage[top=20truemm,bottom=20truemm,left=20truemm,right=20truemm]{geometry}
231
232'preamble': r'''
233
234\setlength\parindent{1zw}
235\renewcommand{\baselinestretch}{0.8}
236
237\usepackage[version=4]{mhchem}
238\usepackage{siunitx}
239\usepackage{chemfig}
240
241\makeatletter
242\renewcommand{\maketitle}{
243\begin{center}
244    {\Large \@title} \par
245\end{center}
246\begin{flushright}
247    \@date \hspace{3zw} \@author \par
248\end{flushright}
249}
250
251\@addtoreset{equation}{section} \def\theequation{\thesection.\arabic{equation}}
252
253\makeatother
254
255\pagestyle{plain}
256\thispagestyle{plain}
257
258'''
259}
260
261latex_elements['tableofcontents'] = r'''
262\pagenumbering{arabic} % page numbering as arabic
263\pagestyle{normal} % page set to normal
264'''
265
266# Grouping the document tree into LaTeX files. List of tuples
267# (source start file, target name, title,
268#  author, documentclass [howto, manual, or own class]).
269latex_documents = [
270    (master_doc, 'output.tex', u'NewTitle',
271    u'Fujisawa', 'howto'),
272]
273
274# Numbering tables and figures
275numfig=True
276numfig_secnum_depth=2
- 218行目
ペーパーサイズ
- 221行目
フォントサイズ
- 225行目
geometryパッケージ 上下左右の余白調整用
- 227行目
日本語用パッケージ。無くても大丈夫
preamble部 ここが重要
- 234行目
段落の始めの字下げ
- 235行目
行間を縮めている
- 236行目
表紙部分の設定コマンド
- 237行目
mhchemパッケージ 化学式等に使用する
- 238行目
siunitxパッケージ 単位混在の数値表記に使用する
- 239行目
chemfigパッケージ 化学構造式の描画に使用する
- 241-250行目
タイトル行をコンパクト化
- 252-253行目
ページ番号をつける
- 261-264行目
目次の削除
- 271行目
文章スタイルの選択。ここでは簡潔なメモ用の
howtoを使用- 275行目
表、図の自動連番
- 276行目
表、図の自動連番のフォーマット
重要
古いバージョンのsphinxを再コンパイルする際の注意
新しいバージョンのsphinxでは
renewcommand{maketitle}{
ではなく
renewcommand{sphinxmaketitle}{
と変更しなくてはならない。
1.4. windowsの場合の sphinx の文章作成環境の設定
windowsの場合はlinuxと若干異なる